Ever bought a new cube, only to not like it? Or maybe you do like it, but feel like there’s something missing? Setting up your cube can give your cube a feel unique to you, making solving a pleasant experience.
Our cubes also go through a lot. We do hundreds of solves per session, drop them, sometimes just neglect them. They need to be taken care of too. Setting up your cube can also help in maintaining it.
Well with so many benefits, you may wonder what the right way to go about cube setup is. Follow the steps listed in this blog, and your cube will feel perfect in no time.

Step 1 - Cleaning the Pieces
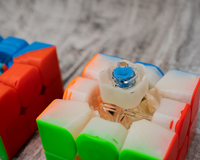
It’s time to clean up! Turn a layer 45 degrees and remove an edge piece. Then continue to remove all the pieces in a similar manner, until you’re left with just the core (as in image).
Keep the core aside for now.
Put on some good music or a series you’ve been meaning to watch for additional amusement - cleaning can sometimes get boring. Take each piece and carefully remove any dirt or dust that may have accumulated. The best option would be to use a microfiber cloth, but a regular cloth works just fine too. I personally wouldn’t recommend tissues as they sometimes tend to leave bits in your cube, just making your job harder. You can also use a toothbrush to reach the tracks. Don’t worry about getting it spick-and-span. If it’s 90% clean, you’re good to go.

Step 2 - Setting up the Core
Unscrew the core and clean out the centers. You may also clean out the screws and springs, since they may have lube left from the previous setup. Now we’ll proceed to lubricating. For the core, it’s recommended to use heavier lube. You can use weight 4 or 5, or for an even better feel, Nucleus - which is my personal recommendation. Apply a little bit of lubricant to the grooves of the screw, as well as the head of the screw, where the spring touches the screw itself. Repeat this with all six screws and reassemble the core. Keep the tensions slightly loose to help in assembling the cube later on. Remember to keep all the screws at an equal level while screwing them back in, to ensure continuity on all sides. There are also kits that come with some MoYu cubes to help you do this. You may also keep another NxN cube with you to refer the colour order from (which center goes where).

Step 3 - Assembling and Lubrication
Take one corner and one edge piece. Apply a heavy lubricant - anything meant to smooth or slow down the cube goes here, and we recommend anything above weight 3. Do this with both the corner and the edge, and begin to reassemble. Start with putting in 2 edges on a 3x3, followed by another corner and an edge to create a block. For bigger cubes, you can follow the tutorials on Cubelelo’s youtube channel. Place the lubricated corner and edge on opposite sides of the cube, to help spread out the lube to all pieces.
Continue to assemble all the other pieces in a similar manner, until you have one edge and one corner left.

Step 4 - Additional Lubricants
The main lubricant is enough to reduce friction, but this is the part where you get to modify the feel of the cube to your preference. Any lighter lube, such as Velocity goes in here. Apply the lubricant to the main piece itself and reattach the pieces. Now, do a couple of solves, just enough to spread out the lubricant to most pieces. We’ll be doing more break-in solves later, so just 3-5 solves should be good. Turn a few sides and listen to the sound the pieces make while moving. You should hear the lubricant inside, a squishy sort of sound. If not, you may want to add a little more lubricant.

Step 5 - Adjusting the Settings.
After lubrication, we move on to the more nitty-gritty parts of the cube, i.e. the core settings. Depending on your cube, you have the option to customize the screws, the springs and the magnets.
- The screws are in charge of attaching the pieces to the core, and keeping them intact. For the screws, find a setting that doesn’t let pieces pop out too easily, but isn’t so tight that you are not able to corner cut. Remember to tighten each side equally. This helps maintain uniformity throughout the cube. You can do so by counting the number of times you turn the screw on each side, and repeat this process until you reach the optimal tension.
- The springs take care of how much the pieces can move in the space they have, or in other words, corner cutting. For the springs, you can either change out the springs entirely - as in gan cubes - or adjust the compressibility of the springs. Start by the middle setting or nut, and test out the way the pieces move and whether or not you like the feeling. If it’s too tight, try a lower setting, and if it’s too loose try a higher one. You’ll know you’ve reached the optimal setting once the pieces feel just right for you, and doesn't cause too many problems for your turning style.
- The magnets are in charge of keeping the pieces close to each other to give the cube a more stable feel. Similar to the springs, start off with the middle setting. If the cube feels too blocky, move to a lower one, and if the pieces feel too flimsy, move to a higher one. Choose a setting that compliments your turning style.

Step 6 - Break-in and Enjoy!
Break-in simply means properly spreading out the lubricant to all of the pieces. After breaking in, the cube no longer has the initial squishy feeling and you should not be able to hear the lubricant while turning. The cube should feel fast and smooth, with minimal friction. Depending on the amount of lubricant you’ve put in, you will need to do anywhere from a 100-250 solves until the cube feels optimal. You can also add more lubricant after break-in if you want to change the way the cube feels.

Overall Maintenance
It is recommended to set up your cube once every 1.5 - 2 months, depending upon usage. Keep the cube away from dust by storing it somewhere inside, and by using a cube pouch while traveling. If you choose to keep your cubes on display, you may have to clean them more frequently. Needless to say, try not to drop your cube to avoid scratches and breaking pieces.

Conclusion
Set ups are an essential part of cubing. They help customize your cube to your choice, making the cube and the process more enjoyable. It is very important to set up your cube from time to time, to retain the feel and prolong the life of the cube - by preventing the pieces from dying out due to friction.
We recommend using a combination of Cubelelo’s Standard and Premium range of Silicon based lubricants for the best results. You can also find screwdrivers and additional magnets on Cubelelo’s website if you wish to magnetize your cube. If you have any questions or tips regarding setup, please feel free to share them with us in the comments!
Happy Cubing :)
Avani Sood


